Do you use Instagram to market your business?
Are you keen to learn how to run Instagram Retargeting ads to your website visitors?
By using this simple six step guide (which was featured on socialmediaexaminer.com), I will show you exactly how you can start running Instagram Retargeting Ads and Campaigns to your website visitors in less than 15 minutes.
What You Need Before Getting Started With Instagram Retargeting:
Before you can begin creating Instagram Retargeting Ads to retarget your website visitors, you will need the following:
- An active Instagram Account
- A active Facebook Ads Account complete with payment information (e.g. Credit Card)
- Admin access to your website’s Content Management System
- Google Chrome Browser
Bonus:
Download the EXACT Template I use to create perfect Instagram Retargeting Ads that get approved every time I submit them to Facebook. Click here to get your free copy.
If you don’t already have a Facebook Ads Account, you can create one using this link. If you need help setting up your Facebook Ads Account, I recommend you check out this guide by Michael Stelzner and Amy Porterfield.
Step #1: Set Up The Facebook Pixel On Your Website
Before you can begin creating Instagram Retargeting Ads to retarget your website visitors, you will first need to set up the Facebook Pixel on your website.
There’s a few ways to do this, but for the purposes of this guide, I will be using the Facebook Power Editor.
First, open Google Chrome and log in to your Power Editor using this link.

If you manage multiple accounts, please make sure that you are logged into the Facebook Ads Account that corresponds with the website that you wish to implement Instagram Ads Retargeting for.
You can double check which Ads Account you are logged into in the top right hand corner of your Power Editor.
Second, navigate to the Tools tab in the menu and then click “Pixels”.
![]()
Third, if you haven’t done so already, create your Facebook Pixel by clicking the green “Create A Pixel” button and then name it.
![]()
If you already have an active Facebook Pixel, you can access it by clicking on the “View Pixel Code” option under the “Actions” Button.
![]()
You then need to copy your Facebook Pixel code in full and then paste it between theandin your website code.
For more detailed help installing your pixel, please refer to this link.
Finally, check to see your Facebook Pixel has been installed properly and is working correctly by using the Facebook Pixel Helper. This is a free plugin for your Google Chrome Browser. If you’d like to download this plugin or are chasing a more detailed guide to checking your Facebook Pixel is working correctly, please click here.
Once the Facebook Pixel has been successfully installed on your website, Facebook will automatically start tracking every person that visits your website. This will come in handy later.
Step #2: Create A Custom Audience For Instagram Retargeting
Before we can start using Instragam Ads to retarget your website visitors, we must first create a custom website audience.
To do this, click on the “Create Audience” button underneath the Facebook Pixel tab.

Then create a custom audience that you’d like to run Instagram Retargeting Ads to.
For this example I have chosen to retarget anyone that has visited my website in the last 30 Days.
I recommend creating audiences based on the action you’d like the end user to take when they see your ad, instead of broadly targeting every website visitor like I am in this example.
Please note that the domain option will only show up for those users that have their Facebook Pixel installed on multiple domains.
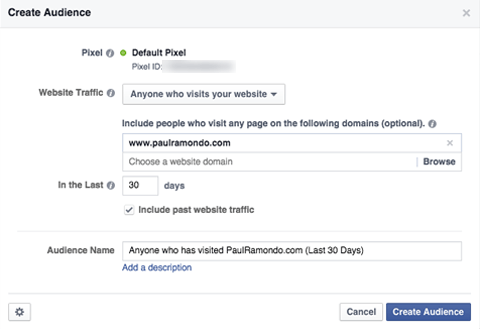
Once you’ve decided who you’d like to retarget, hit “Create Audience”.
Step #3: Create Your Instagram Retargeting Campaign:
It’s now time to create your campaign which will use Instagram Retargeting Ads to retarget past website visitors.
To do this, open up Power Editor and select “Create Campaign”
Then create a new campaign with any of the following objectives:
- Clicks To Website
- Website Conversions
- Mobile App Instals
- Video Views

For the purposes of simplicity, I have chosen “Clicks to Website” as my campaign objective.
Once you have done this, hit “Create”.
Step #4: Create Your Instagram Retargeting Ad Set
You now want to edit your Ad Set.
1. First, set your Budget and Schedule.
2. Second, you need to edit your Audience so that you are only targeting people that have previously landed on your website.
To do this, select the custom audience that you created in Phase 2 in the Custom Audiences section at the top.

Once you’ve done this, click “Save”.
3. You now need to select Instagram as your Placement.

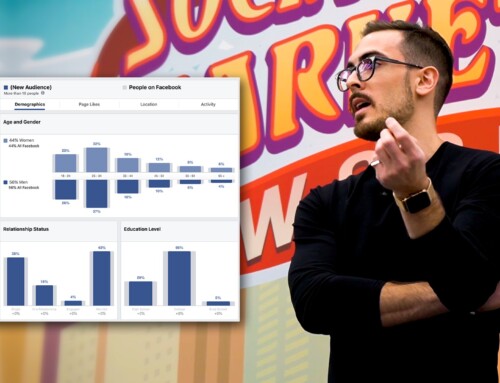
4. Finally, you need to confirm that the Custom Audience you have selected and refined for Instagram, actually has people in it. To do this, simply check your “Potential Audience” (in the top right hand corner of the Ad Set Panel) has more than 20 people in it.
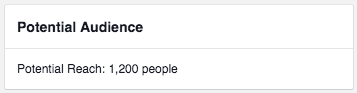
If it doesn’t have more than 20 people, you may need to broaden your other targeting parameters. Alternatively, you can wait until your Facebook Pixel has captured more than 20 people who have visited your website in the past 30 days that also have an Instagram account.
Step #5: Create Your First Instagram Retargeting Ad
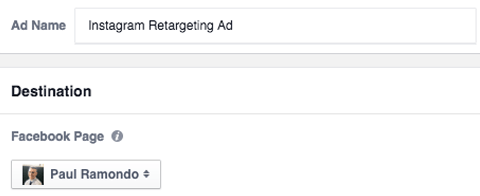
1. First, select the “Instagram Retargeting Ad” that you have created in the “Past Website Visitors” Ad Set you have just set up.
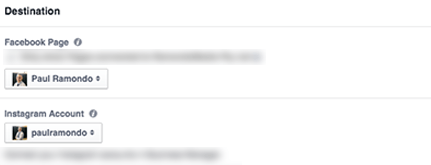
2. You now need to select the Facebook Page that is associated with your website.
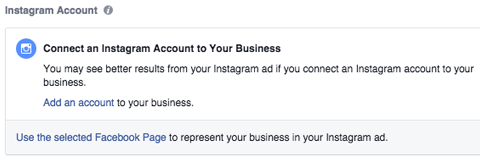
3. Once you’ve done this, you now need to Connect an Instagram Account to Your Business. Alternatively you can use the selected Facebook Page to represent your business on Instagram (I don’t recommend this).
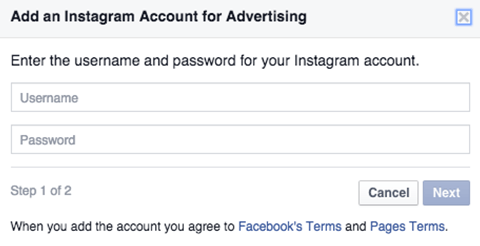
4. Click the “Add an account” link to add your Instagram Account to your Facebook Ads Account.
5. You will now be asked to enter your Instagram Username and Password details. Once you have done this, click next and Facebook will assign your Instagram account to your Facebook Ads Account.
6. Navigate back to your Ad and choose the Instagram Account you just verified.
7. You can now create your Instagram Retargeting Ad just like you would any other Facebook Ad. However, before you do so, I recommend you consider the following:
- Facebook recommends an image size of 1080 x 1080 pixels for Instagram Ads (as well as Instagram Retargeting Ads)
- Just like Facebook, you need to keep the text in the ad to no more than 20%.
- Click here to download the exact template I use to create Instagram Ads that get approved every time I submit them to Facebook
- If you don’t want to use this template, you can use the Facebook Grid Tool to check if your ad contains more than 20% text before uploading it to Facebook.
- Facebook also has a great guide for Instagram Ad creative that can be found here.
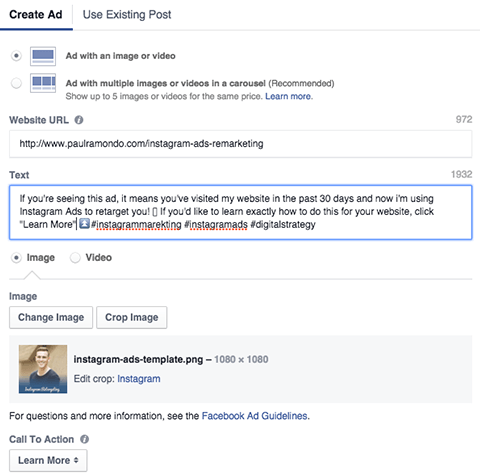
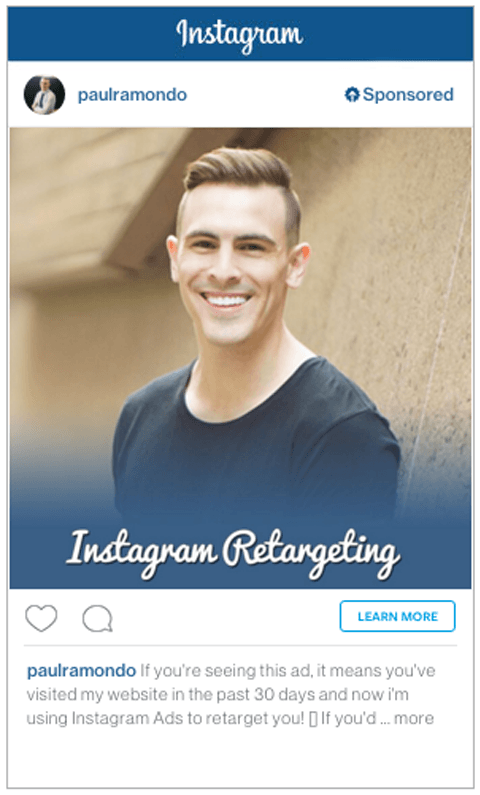
As you add information to your Instagram Retargeting Ad, you will see your ad preview update automatically.
Bonus:
Download the EXACT Template I use to create perfect Instagram Retargeting Ads that get approved every time I submit them to Facebook. Click here to get your free copy.
Step #6: Launch Your Instagram Retargeting Campaign:
Once you’ve completed all of the steps above, you’re ready to launch your very first Instagram Retargeting Campaign.
![]()
To do this, simply click the “Review Changes” button in the top right-hand corner of your Power Editor and follow the prompts.
Your Turn:
By using this six-step strategy, you can effortlessly target your website visitors on a platform that is almost unparalleled in its end user’s engagement.
When you combine what you have learnt above with granular targeting, optimised ad copy and appropriate ad design; you will be left with a new, powerful weapon you can add to your digital marketing arsenal.
What was your experience with Instagram Retargeting like? How did the results compare to Facebook Ads Retargeting? What other tips and tricks have you found that can help others get more ROI from their Instagram Ads? Please share your thoughts in the comments section below.
Cheers!
![]()
Related Posts
![If You Haven’t Tried Snapchat Ads… NOW is the time. [$125 Snap Ad Credit Inside]](https://paulramondo.com/wp-content/uploads/2020/10/snapchat-ads-header-500x383.jpg)

Join over 5,000 of your peers
dominating their Facebook Ads
& digital marketing funnels
And you’ll receive:
Free Blueprints, Templates & Resources
Access to Private Facebook Community
Subscriber Only Discounts & Giveaways